background

Wednesday, October 27, 2010

Add a Touch of Glass to Your Do

Hello Everyone! 
 As promised, I'm bringing you the pics of my newest Sea Glass Hair Accessories :)
I know, I know....you've been chomping at the bit....checking back daily....fretting....wondering when they'll be unveiled......
Well, your wait is finally over!!


Okay....so I'm just having some fun with you....but, maybe, just maybe....

...you were wondering about them a little, tiny bit? Hee hee :)

Isn't that one above so pretty...I found some gorgeous Olive Green glass this year.  It looks stunning paired with copper. 

Those are 2 amazing pebbles nestled between the glass there, similar enough in color to be matched up, but different enough in design to make them each unique!

I really like to do these random color pieces....makes it so easy to wear with jeans...and gives those bits of rare glass (like the little blue ones) a chance to shine!

These little green beauties measure just an inch and 1/2 each (about 4 cm).  They pack such a gorgeous statement into a tiny package :)

This one is lovely in shades of sea foam and wrapped in gold tone wire.

This is one I created a while ago, but LOVE sooo much!  Like an Ocean Mosaic, it's like scooping sand into your hand and pulling up this treasure....all kinds of shiny and beautiful bits all in one place!

I like to imagine this in the hair of a Bride getting married on the Beach :)


There is some of that lovely Olive Glass again, this time between soothing coffee browns....

This one is so special....elongated, thin pieces fit together like a staircase in the clouds and showcasing one subtle shard in sea spray blue. (say that 10x fast...haha)
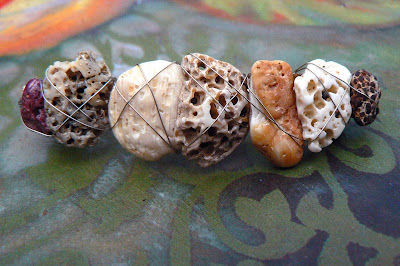
This is one of my favorites...pitted shell and stone....such wonderful texture....all natural colors....even that purple one on the end!

....and last, but not least, this Wintry Gem is soft in whites...and a bit edgy wrapped in copper....like a punk snow princess...haha!

Hope you enjoyed them...

They are now in my shop for your Holiday gift-giving consideration *wink*

Have a wonderful rest of the week!!! I'll be "sea"ing you soon.... (the dork in me, yet again) ;-D
Hugs,
Cameron

Wednesday, October 20, 2010

Making Friends

Hello all!
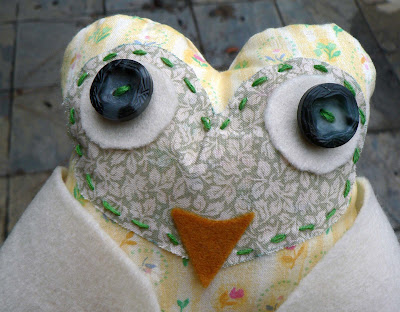
 Look Hoo stopped by....

                                      Some new little friends Hoo just want to say Hi!

Winky's the name of this playful gal....

...And Blinky is her sleepy pal :)


This garden owl is shy, little Maisy....

....made in sunshine yellow and covered in daisies :)


...And certainly Flora is an owl worth meeting...

...her vintage attire...

....makes a shabby heart start beating!

And now I've introduced you to friends new to this nest....
Please stay tuned to lay your eyes on the rest :)

These darlings are residing in my shop as we speak.

Thanks for bearing with me thru that...haha!  I was trying to be cutesy....though dorky seems to be working, too :D  I was hoping to have more to show you...but since I'm hand-stitching every single one of these guys, they're taking a bit longer than I expected.  I am planning to make a few more before I run out of time and actually have to start packing!

I'm also putting some finishing touches on more sea glass hair clips (a metaphysical store is carrying them now, too....and took all that I had)
So, I want to make sure I have a selection for all of you to peruse, as well :)

Thank you, as always, for sticking by me and supporting my need to create....you're the best!!

Smiles, Cameron

Monday, October 11, 2010

My New Neighborhood!

Hello to all you Lovely Friends!  Hope your weekend was a good one!

I stayed up a little late on Saturday to paint, among other things...and was able to finish this! 


Welcome to "Cozy Street" :) 11x14 inch Mixed Media on Canvas.

This was soooo much fun to do!  I really enjoyed decorating the 4 little houses, playing around with each one to give them a personality of their own :)  I can definately see more of these "neighborhoods" in my future!

 I incorporated more crackle glaze into the mix (which I really like the look of)!

...And this time, I added a few more personal touches... These 2 little kitties in front are modeled after my own fluffy duo....1 black and 1 calico :) 
I did an old post about them here.

I used a page from an old dictionary for this door and one roof...the definition of Home...
Can you see, also, I used beads as the doorknobs.  I like the dimension and inviting feeling the little knobs give....like there would be tiny furniture and the smell of cinnamon coffee cake wafting thru the house if only you could just turn that little knob and go in :)


....And this house is number 502...the same address of my childhood home...where all cozy memories begin!  My Dad's parents first resided in the home, and my parents still live there today.  It is the hub where everyone meets and chats and mingles, where cousins, nieces, nephews, etc. run around and play...
I felt it necessary to pay homage to my true "first home" while on the cusp of moving into our own :)
Love ya' Mom & Dad!!!

I have put this piece in my shop, fyi ;oD


...And this, my Friends....is my new acquisition!! Isn't she so pretty!
My talented Blog Buddy, Theresa MacNaughton at Fairie Moon Creations
knew I was drooling over her and offered to do a trade (I just love trades....everybody wins!) She makes gorgeous jewelry and does wonders with yarn, by the way....you might want to check her out if you're not lucky enough to know her already :)

I sent her Mushroom Cap Cottage, and I received this beautiful piece entitled, "Every Girl is a Princess".  I adore that title, too! Thanks, Theresa!  I will treasure her :oD

I hope to be back soon, but I fear my posts will begin to slow as we gear up to start the moving process....
You won't forget about me, right?!  Okay, good.... :)
Hugs all around,
Cameron

Monday, October 4, 2010

Fitting Halloween in a Box

Or at least on one!...haha....

I told you more little painted boxes were in my future!

I think they're a really fun way to add a bit more Halloween Whimsy to my house without destroying my budget :-P

I've been wanting to experiment with crackle glaze for a while now....

So, I thought these would be a safe, small project to experiment on...
I like the added texture and "finished" appearance it gives!

I learned, though, the thicker you apply, the larger the cracks....next time I won't be so careful, and I'll really slather it on :)

This one I made for a "Nightmare" lovin Friend!
I wanted to paint Zero inside, but the sides of the box were a little too deep to have good control over the brush/pen....so, a Halloweeny wrapped gift seemed appropriate :)

I used some irridescent glitter over the ribbon inside, and Jack's bowtie outside...
I think you can just barely see some of the flecks in this picture :)

My only complaint with these boxes is sealing them.  Does anyone have a suggestion on what to put on them that doesn't make the lids stick?  I've tried the crackle glaze and Mod-Podge with both having that kinda tacky feel....I have to pry the lids off sometimes...and the paper tears a bit :(

It's cold and rainy here today...and I'm loving it!! Hope you are all having a wonderful day, too :)

Big Hugs,
Cameron
Related Posts Plugin for WordPress, Blogger...